Monday, November 28, 2005

Now my turn signals are cool, too

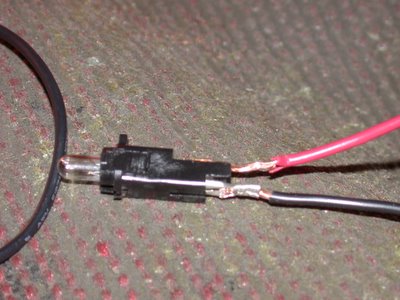
Just got done wiring the dashboard signal indicators just like Dad's. The only difference in how I did mine was that I used the tab that normally connects with the clock housing. You can actually pull that tab through a space in the bulb socket and get it to stick out enough to attach a small terminal to it.

For the terminal attachment I just did the same hack job I did for dad with the existing "red" female terminals. Then I wrapped it all in electrical tape to keep it together. Sweeeet. :)

Friday, November 25, 2005

How to make your dashboard signal lights independent

I have a theory that Karmann wanted to make the Ghia with independently flashing in-dash signal lights. That's why there are two in the clock. However, that idea never materialized because the folks at VW didn't fulfill their end of the bargain by making it possible for the lights to flash independently.

But, Dad and I just got his '73 vert's signal indicator lights to flash in accord with which direction you're signaling. Here's how we did it:

We started by studying the hell out of the wiring diagram. And those of you out there familiar with it know that it begs to have the hell studied out of it if you hope to get anywhere. But, to give you a newfound appreciation for the complexity of this diagram it took myself (a Web page developer), my dad (a professor of Management Information Systems who last year finished his dissertation on artificial intelligence) and my grandpa (a retired chemistry professor who recently published a book on Valence Bonding) an entire afternoon to make sense of just the turn signal wiring.


Here's a screenshot of the original turn signal wiring:


And here's how we modified it. The key to the new wires is the usual red=pos black=ground:


As you can see (take your time if you need) it really is as simple as disconnecting the dash indicators from the flasher relay and hooking them up directly to the exterior signal light wires. We, of course, ran into some sticky spots.

The first test we did was to just hook a test wire up from the signal wire to the small male terminal on the bulb housing. It proved at first that you could, indeed, get the bulbs to flash in correspondence with the exterior lights. However, the interior lights would stay on solid when you weren't signaling.

This was because the wire was essentially acting as a ground for the interior bulbs, grounding it through the exterior lights themselves. But, when you did signal the bulbs did blink. So, we just needed to figure out how to keep them from coming on when the signals weren't blinking.

The trick was to keep the bulbs from getting their positive connection from the clock housing. There's a metal tab next to the light bulb that makes that connection. We snipped that tab off and then soldered a wire up to the other end of that single piece of brass, then we had control over where positive and negative were coming from.

That was the key, it turns out, and the rest of it was a simple matter of using the exterior signal wires as positive and then another wire for ground. Easy! Well, except for the three hours of swearing Dad endured soldering together tiny brass fittings onto 18 gauge wire. Here's the modified bulb housing:


And here's a pictoral overview of the wiring for further reference:

Wednesday, November 23, 2005

Save money: buy premium!

Just tried a tank of 87 octane (here in MN it has no ethanol) and the MPG difference is very significant: 17 mpg as opposed to 22-23! So, even though it costs more per gallon, it seems quite obvious that the milage gains are significant enough to make running the Ghia on high octane fuel cheaper than low octane.

Thursday, November 17, 2005

ADD indeed

My name is Chris, and I suffer from ADD.

Now, don't imagine me saying that in some solemn, morose mood as if I'm admitting to a serious affliction. I've joked about my having ADD for some time but only recently had it officially diagnosed.

As this post demonstrates, I'm not too secretive about it. It's not really shameful or debilitating. In fact, one classic trait of ADD is what's commonly referred to as "hyper focusing." It's a curious duality of a condition most think of as strictly the inability to pay attention.

In addition to being easily distracted, people with ADD conversely find themselves unable to be distracted if their attention's gotten particularly fixated on something. As with everything, it's a source of great strength and great weakness.

I credit my ability to hyper focus with some of my most creative writing and my ability to learn new technology quickly. I also fault my mind's tendency to hyper focus on the wrong things at the wrong time.

I got a job right out of college because I luckily hyper focused on learning HTML and Web design during my spring 1996 college semester. I took no classes; I just read a few on-line tutorials and viewed a lot of page sources. However, four years later I was unluckily hyper focusing on 3D game design right around the time I landed a new job programming ASP, SQL database-driven Web pages.

I did some amazing 3D work for my hobby in game design, but I progressed and performed only average at my paid job. Being average isn't anything to be ashamed of, but it is a huge source of frustration for me. Not to toot my own horn, but I'm pretty damn smart and an average performance is just not acceptable to me.

That's where ADD got bad for me. I didn't lose my job over it, but I was very frustrated and got several lectures from bosses who expected more. They were right to expect that and I continued to be frustrated at myself for not being able to simply "shape up."

Of course, that's the line you cross that turns a personality quirk into an actual mental illness that's negatively affecting your life. So, I got tested and diagnosed with ADD and they gave me drugs!

They really do help, and I can actually choose to concentrate and think about something. However, I still can be distracted by something new, shiny, blue and low to the ground with electrical issues. But, my prescribed narcotics keep my head clear enough that I know when to say when.

Interestingly enough, when I'm hyper focusing on Ghia repairs or upgrades and it gets busy at work I end up being very productive in both at the same time. I know that's just natural with anybody as when you're excited about something your energy level is higher so you'll be more productive. But, I think ADD makes it even more so with me.

Dad gave me a hard time on here about ADD being the reason I was suffering from post-fix depression. But, of course, he's prone to the same depression and most likely due to the same condition I inherited from him (and Mom). And, in classic ADD fashion, he's been curiously silent on the blog here for the past week. I wonder what he's hyper focusing on these days?

Tuesday, November 15, 2005

Dual carb experiment: this could work!

Had some fun taking apart the free carburetors last night. Really not too complex inside when you get down to it. Of course, at its simplest a carburetor just sprays fuel into a stream of air in the right proportions to atomize the air and make it as combustible as possible.

The rest of what the carburetor does is regulate the air and fuel mixture depending on the variety of conditions a motor encounters. There's a float chamber where the fuel initially dumps into. If too much fuel is being pumped into the carburetor than it can use the float raises up and cuts off the flow of fresh fuel. Inside that float chamber are a couple valves here and there that seem to accomodate that process.

Then there's a fuel pump injector tube that points right into the "bowl" under the butterfly valve that's part of the automatic choke. That tube's really thin and can be easily twisted up and off for cleaning and replacement.

Then there's a gasket between the top and bottom portions of the carb and a gasket at the bottom for where it fits on the manifold. Overhauling is really just goin to be a matter of completely dismantling it, cleaning each part in solvent and making sure there are no obstructions in any of the tubes and then piecing it back together again with new gaskets and parts where needed.

The complicated part will be, of course, tuning them. I read about terms like "jetting" at TheSamba.com and still have no idea what exactly that is or how to "properly adjust the jetting" of these carburetors. I think I need to add a book about VW motors and carburetors to my Xmas list. Dad? :)

A good way to test, of course, is to slap one of the rebuilt carbs onto my existing manifold in place of my current carb, turn the key in the ignition and see how well it all works. If both check out, then I'll start on putting them both in on top of Solex Kadron manifolds (there might be a pair that will work with modifications at TheSamba.com's classifieds for pretty cheap) and plot how to link them together.

My initial reaction to dual carbs was that balancing them or getting them to work as synchronously as possible would be tricky. But, the more I learn the more straightforward it seems. As long as they're both working properly you just need to make sure the throttles are being pulled equally with a linkage bar and then hook up a "balance line" between the manifolds. From what I understand, a balance line is just a vacuum tube that connects the manifolds together so any imbalance in vacuum, fuel or air can be minimized by one manifold sucking from the other via this tube if need be.

There's still a lot to learn and figure out, but I've got months to do so.

Monday, November 14, 2005

Christmas come early!

Finally grabbed the three old carbs from Jamie's garage. Here they are!


From left-to-right they're a 28 pict-1, 30 pict-1 and another 28 pict-1 (with the air cleaner on top).

My plan is to use the one on the left to learn on. It's the first to be taken apart, so I'll make my first mistakes of carburetor rebuilding on that and won't hold my breath for it ever living again. But, depending on how that goes I'll either make a serious effort at successfully rebuilding the 30 pict-1 and installing that on my car or I'll try rebuilding the other 28 pict-1 and follow my dream of building a dual carb setup with that and the other one.

Best part, of course, is it's all free! Jamie doesn't need them and would like to see what I end up doing with them. They're predicting up to 8 inches of snow by tomorrow night, so it looks to be that time of year when I won't be driving the Ghia until Spring and I'll have time to really study up on these complex little things.

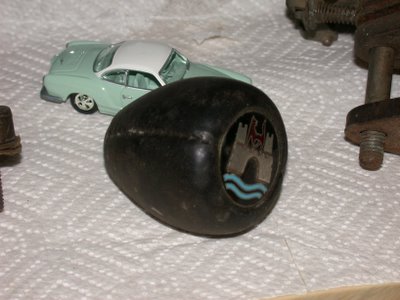
As a bonus, I found a leather shifter knob in the stash of parts with the Wolfsburg symbol on it!


I asked more than once if Jamie didn't want the shifter knob for himself. He didn't seem to mind letting that one go for nothing, either. Sweet.

Sunday, November 13, 2005

First road trip and possibly last before Spring

Drove our American bulldogs, Boris and Natasha, to their grandparents this weekend for Festivus. Reese joined us later driving her Subaru separately as she had class to finish up and the Ghia would have been a tight fit with both of us and the dogs in there.

The poor dogs don't quite like the Ghia as well as the Legacy, though. Only one can really lie down at a time in the back seat and the front seat is just a tad too small for either of them to comfortably curl up in. But, Natasha can do the front seat at least. Boris can only sit up in it.

Of course, I got lots of thumbs up from people on the drive down. I'm never really sure if it's the car, the dogs or the combination thereof that people admire.

I did a couple speedometer tests on the way down, too. I timed myself around 57 seconds between mile markers while keeping it at 60mph. So, the speedometer's reading a little slower than actual.

Most of the way down I kept it right at or a little below 70. When I checked my milage it was just shy of 26 mpg. Seems to me for that speed (and it could be closer to 75 as my speedometer seems a bit off) that's actually pretty decent mpg. I should be able to get around 30 if I cruise at 60.

I also made sure to check the oil level as there's a very slight leak in the motor. Since the oil change several weeks and about 1000 miles ago I've had to put about 1/4 of a quart of oil in just to make sure it's near the full mark. Not to bad at all. Also impressive is the look of the oil when I checked it yesterday: remarkably clear! Dad's Ghia has just under 50K miles and mine has just under 70K. I'm thinking both of our odometers are reading accurately based on the condition of the motors.

Saturday, November 12, 2005

Birth certificate ordered

I spent some time looking at the sticky topics on thesamba's ghia forum last night and found a few interesting items:

  1. I ordered my Ghia's birth certificate last night. You email the VW museum in Germany and request a "birth certificate" which will tell you the original color, options, engine #, shipping delivery point in the US, etc., what ever they have in their records on your car.
  2. Specifications for a '73 included: fuel consumption- 24mpg, and top speed- 84mph.
  3. Original color? I'm guessing Phoenix red with a black interior and top. That's the color on the parts of the body that weren't repainted. I'm tempted to take off the custom vinyl job that is covering up the original dash and instrument panel. I wonder what's underneath? The BC should tell what it shiped with.
  4. Engine number: AK xxxxxx This looks like the original engine and leads me to believe that the odometer is correct in reporting 47,000 original miles. The AK model engine shows up on the 74 model year cars but other sources show 73 as well. The VIN number also indicates a late '73 production, possibly during the changeover to the 74 model.

I'll be interested to see what the BC tells me.

Friday, November 11, 2005

Gas milage report

Well I think the accelerator cable and tire pressure adjustments have helped with the milage. I now seem to be getting more like 22-23mpg for my daily commute, part city and part freeway. Now that the fuel guage is stable, I've been making some checks to see how much gas is used at the 3/4, 1/2, 1/4, and R points. I've developed the following scale that reflects where the guage reads and the gas consumption at that point:

3/4 - 3.0 gal used
1/2 - 5.5 gal used
1/4 - 7.75 gal used
R - 9.3 gal used

I have to verify the 1/4 and R levels yet but I did fill with the needle just above the R mark and put in exactly 9 gallons. It looks like at that point there would be just 1 gal left. That's about right so the guage seems to be working properly and doesn't fly around anymore since the new wire to the sending unit was installed. Knowing these points will help keep a spot check on milage without having to actually fill it.

Hey Chris when you come down for Thanksgiving how about helping me give the Ghia a tuneup? Adjust the valves, timing, points, plugs, etc? True father - son bonding and all that stuff. Better'n football!

Thursday, November 10, 2005

Realigning the Ghia and my thinking

Just got back from Mr. Tire where they charged me $70 for an imperfect alignment job. They were good an honest about it: the car is aligned now as straight as it's going to get and the tires won't wear wrong. It's always pulled to the right and now it doesn't pull to the right quite so much.

The real fix is to install a new front axle beam. The one on there now has been welded in a few spots to fix rust. Yeah, you read that right! Kind of scary, but they say it's solid enough, it's just never going to allow the car to be aligned right unless I replace it.

A quick search of mamotorworks.com's catalog showed that a new font axle beam with ball joints and linkages for the wheels is about $300. Not too bad, considering. From the looks of it, installation should be quite simple for the boys at the shop. I briefly tossed around the idea in my head of installing a new one myself some day, but I would need to take it to an alignment shop after that anyway. So, I'm guessing the real way to go is make an appointmen to have a new one installed and have the front end aligned all in one shot and one bill.

Reese was giving me a hard time about how much money this car was costing. She loves the car, and has no problem with spending the money on it we need to keep it alive. I struggle myself, though, with spending money on it. But, that struggle is just a reaction to typical automotive economic thinking.

Usually, a car is a money-losing item. You can buy a brand new one for $20,000 and sell it two years later for $13,000. And, in those two years you've made payments, so you really end up losing money in the end.

With a 33-year-old classic car like a Ghia, the economics are different. The MSRP for the 1972 Ghia when brand new was $3,099. I bought mine for $3,100. The car stands to only appreciate in price if I keep in in the condition I received it. If I spend money on it, and especially if I spend money on body repairs, the value of the car will appreciate. Just put "had an off-body restoration done" in your classified ad and you can up the price a couple grand.

In that respect, the car is more like my house. Sure, it costs money to fix, but it's actually money invested not money wasted. I've never owned a car like that, so I'm having to realign my thinking. Well, I should say I've never owned a car like that to my knowledge.

I once owned a '93 Honda Civic 3-Door (hatchback). I bought it for $5K and sold it three years later for $2,500. Two years after that I sold my money-hogging 2002 Subaru and thought "Hey, maybe I could get another '93 Civic hatch?" To save my life I could not find one for less than $5,000. That's The Fast and the Furious selling small, Japanese cars for ya.

Tuesday, November 08, 2005

It's only a scratch!

I took the Ghia to Auto Artists to get touchup done on some of the paint chips and scratches. The problem is that the current paint job was a custom color and I don't know what it is. Auto artists tried to match the color as close as possible but it has a metalic fleck in it that is difficult to match. Oh well, it's only a scratch...

My dad's Ghia was his pride and joy. How I managed to get to take it out on dates I'll never understand (see "Tales of Ghia head turners" October 24th post.) Especially after I managed to wreck the family station wagon the first time I drove a car all by my self.

In Salmon Idaho in the early 60's you could get a drivers license by just showing up at the county court house with your parents. They sign an affadavit that you can drive and you're issued a license, no questions asked. So I got in the family station wagon and went cruising. First stop was at a friends house to show off my new status. This particular friend had long driveway lined with a picket fence. The problem was I turned into the drive too close to the fence. The fence's corner post was a lot stronger than all the trim, door handles and paint on the right side of the station wagon.

I knew I was in trouble. So I went home, parked the car out in front of the house, fessed up to the deed and tried to calm my now angry father. He had a temper, especially with autos. Mom called him an autoholic, an epithet she now applies to Chris and I. I told him "It's only a scratch." After inspecting the car dad yelled at me, "Only a scratch! You scrapped off half the side of the car!" My driving days were over for quite some time.

My father was of the "trust but verify" school. After a year he decided to trust me with the Ghia, but he would verify that trust the next morning everytime I had the car out the night before. I decided to get my revenge when I discovered the fake paint scratches at the local novelty store. As an insurance policy I let my mom in on the plan in case dad would be so enraged that murder would ensue. So after a late night date I carefully removed the adhesive backing from the fake scratch and pasted it on the right front fender.

The next morning, true to form, my dad went into the back yard driveway to inspect the car. Mom and I watched from the kitchen window, quietly laughing with anticipation. My dad started with the left front fender and then around the rear of the car and up the right side. He was like someone from CSI taking in every possible clue no matter how small. By this time mom and I were outright laughing.

Then dad saw the scratch. It is difficult to describe, but he was like a volcano building pressure leading to a final outburst of molten lava, hot and red. Steam escaped from his ears and he began to pump is fists and turn in circles stoping at each turn to look at the scratch. My dad was in the throws of an autoholic fit with an eruption bound to hit 8 on the richter scale. Mom and I howled with delight. Dad then turned and got closer to see just how much damage was done. As he rubbed his fingers along the scratch he could sense something wasn't right. The scratch had an edge to it. On closer inspection he found he could lift the edge and as he pulled the scratch pealed right off the fender! Dad realized he'd been had. He went from steaming righteous anger to an embarrased silence.

Dad never mentioned the paint scratch and he never inspected the Ghia again after I had been driving it. I try to take the same approach with Pat, she has had a habit of putting scratches in our vehicles, until this summer when I was the primary culprit. I'm still working on fixing that one.

Learn to walk first

The initial high of "Ooh, dual carbs would be so cool!" is starting to wear off and after a talk with Jamie about the 30 pict carb in his stash I'm thinking of starting smaller.

A couple weeks ago I was asking about what the bypass valve on a carb was. I can really see getting in over my head attempting to install a completely new carburation system. I could get a 30 pict rebuild kit for under $20 (I believe) and learn myself a thing or two about the things tearing apart that old carb, cleaning it and putting it back together.

Then, swap out my old one for the rebuilt and see how I did. The car is currently running a lot better and I dare say it even feels somewhat punchy in 1st and 2nd. The stock performance I'm getting out of that motor may be all I need for the first couple years.

So, new plan: rebuild a used 30 pict carb and install it in the ghia. Depending on how well I do with that I'll think about dual carbs someday. Guess I'm learning about the wisdom of "wait until winter to do major repairs/upgrades."

Post-fix depression

I notice Dad isn't posting quite as much in the past few days since he proclaimed just about all of his electrical issues as fixed. He said he was almost sad to achieve that because it's so much fun troubleshooting and fixing things.

My wife, of course, doesn't understand this mentality. In fact, every day I learn more about the radically different mindsets between her and me on the Ghia.

We both love the car and have both wanted one since we were teenagers. Lately, I've been feeling guilty that I'm always the one driving it and working on it. Now, I know she has absolutely zero interest in working on it, but I was waiting for her to say, "Uh, hon, when do I get to drive the Ghia?"

So, I would occasionally offer her to take it to work or class or drive it with me riding if we go around the lakes. Last night she finally told me to stop pressuring her and she'll drive it when she feels comfortable with it. I had to get her to explain this concept, "Uh ... you don't want to drive it?"

"No," she said, "My 2000 Subaru drives better and more reliably. I can take it anywhere without stress!"

And then she said something I understand about as well as antique interior decorating: "I just like having the car, I don't need to drive it."

I decided I didn’t need to understand it too deeply, just to the level that it means I don’t have to feel guilty about always being the one driving the car! I can live with that.

But, as Dad can attest, for him and me it’s not good enough to just drive it. We’re happiest when something’s broken on it, we spend time, thought and energy fixing it and then drive it around again to try out the fix.

So, what are we to do now that our electrical issues are nearing completion? Luckily, electrical issues are probably just the tip of the iceberg when it comes to work to do on these cars.

First off, they both need rust holes patched and protected on the underside. Mine even has a few small scratches on the top here and there that show rust and a little bit of bubbling around the bottom here and there.

I’m considering either taking a welding class or getting lessons from a friend and trying my hand at repairing one spot behind my driver’s-side rear wheel. Based on how that goes I’ll decide whether I want to continue doing the rest of the body work myself bit-by-bit or just get an estimate from a reputable body shop/individual and pay them instead.

I’m actually not too concerned about my ability to repair the scratches on the top that I can see. What I really won’t know how to do and am afraid to touch are the ones on the undercarriage. Hopefully the rust I see on the floor pans are only on the very surface and I won’t need to replace those, just sand ‘em down and repaint.

Still, it does seem that “body off” restoration is the recommended route as then you’re certain to repair otherwise unreachable problem areas. I’d also like to really look into the possibility of sealing up the body work to the point where I wouldn’t have to worry about rust even in winter. If I could do that, then this car could be driven year-round and we’d sell the 2nd Subaru. As it stands, we’re a 3 car, 2 person household.

So much for my “peak oil” pontificating. I just classify myself as an enigma and end the debate there.

The next area is, of course, engine, transmission and suspension. I do need a new carburetor and distributor, according to VW Man. And, for a few extra dollars I can replace both of those with higher-performance parts. So, I’m going to do it!

I’ll wait until the snow is actually on the ground and am therefore no longer tempted to drive the car. Then, I’ll start the task of taking the old carburetor/manifold off and installing a dual carburetor and manifold system with linkage bars for the throttles and a new distributor.

My long-term plan for performance upgrades is identical to my approach to mountain bike upgrades: one small change at a time. That’s the only way to keep the post-fix depression at bay. You install one piece of a performance upgrade, try it out, enjoy the new toy and then when it gets old you plot the next upgrade.

It also helps that it’s more affordable that way. I’m being careful that by waiting on other upgrades that I don’t do harm. Sometimes a big dual carburetor setup can overheat your engine if you have the stock muffler, for example. So, I’ll be doing research on all this before starting in on stuff.

I’m going to lurk around TheSamba.com’s classified section and probably get a dual carb setup on there. Someone is selling a used dual Solex Kadron setup for $225 there. They say it’s in good working condition and are getting rid of it because they recently bought a more powerful system.

One consideration to make about the dual carbs is that you’re going big enough to get a performance boost and to accommodate other enhancements in the future such as less-restrictive exhaust and bigger heads. But, if you go too big for the motor you have now that can cause problems unless you upgrade all that other stuff immediately. Solex Kadron keeps coming up as the recommended system for the 1600 dual port motor in my car, so that’s what I’ll keep an eye out for, and $225 is a good deal on them.

So, here’s to a long winter full of patient research and planning to pace ourselves and ensure there will always be something to fix on our cars.
Monday, November 07, 2005

Now that smells like a Volkswagen

Visited VW Man this morning for the appointment to check on the idle. I took with me a sense of adventure as I had no ride back home, just my laptop. For those out there who don't know me, I'm one of the lucky few who work from home. There's this great coffee shop called Wilde Roast just two blocks away with free wi-fi, so I got some of my morning's duties done while waiting for the car.

They determined that the vacuum advance and retard on my 009 distributor is bad and the distributor needs replacing. Trouble is no supplier carries those currently. They said in a couple months some suppliers will have them again, but for now that just can't be fixed. My carburetor is also leaking, and they recommended just replacing it for the $210 parts and labor they'd charge as a rebuild wouldn't be much cheaper.

I asked about my plan for a pair of 28 pict carbs and the guy winced. He said when they're tuned properly and working right dual carbs work great. But, when they aren't perfect ... yeah, sorta what I thought. I asked about going with a single, bigger carb like a Weber 44 or something and he winced again.

Seems he prefers a good, old, solid 30 pict (a step or two down from the one I've currently got) as it's the most reliable and actually has better throttle response than a bigger carb. Have to think about that one. Jamie's got a 30 pict in his stash, so perhaps before any dreams of cool-looking dual carburetors I'll play around with getting a decent, reliable single carburetor.

But, they advanced the timing (I sorta know what that means, like they rotated the distributor one way or the other to make the cylidars fire sooner rather than later) and the car really drives better! I actually have low-end power and throttle response rather than gently feathering the gas until the motor revs higher. I knew these cars were under-powered, but I also remember my '72 Beetle having better response and power than this!

While they had it in I requested they see about working my heater box levers loose and they tried, but snapped one of the levers in the process. The final solution there, they said, is new heater boxes ($200 or so from what I've seen, not too bad). But, they asked if I wanted them just "wired on" and I said "sure!" Heat!

Reese and I are driving the car down to southern MN this weekend, then, now that we won't freeze in it. We'll be hauling nearly 200 lbs of American Bulldog with us in the back seat (poor Boris and Natasha! They love it, though). We'll buy a big kennel while we're down there for the two of them to sleep together in and just keep. Even when we take the Subaru and are able to strap the collapsable kennels on top it's just such a pain. It'll be nice to not have that hassle anymore. Plus, it's a nice excuse to take the Ghia for our first road trip in her.

And, yes, as the title of this post suggests, with the heater ducts open she smells like a Volkswagen finally! That hot exaust pipe flavor! Most people who've never been in a VW with the heater on don't know what hot exaust pipe smells like. It's not hot exaust (I hope) it's the metal of the pipe itself when it's hot and the air that gets passed by it. Quite distinctive.

I still have to tighten up the hose in the back from the passenger's-side heater box to the heater channel, though, so it's parked in the garage up on ramps at the moment. When it cools down I'll slide under to tighten that up.

Sunday, November 06, 2005

Rear window defogger repair

The rear window defogger now works. Primary replacement part was a new relay from RadioShack. The relay is the same type that runs the horn. Thanks to Chris for finding the RadioShack source. Funny thing is it is a standard part that all stores carry. The relay simply allows one circuit (the switch) to control another independent circuit (the window defogger). I had to replace some terminals to make solid connections and the fuse (in the engine compartment near the relay) was blown.

This now completes the electrical system repairs, except for the passenger's side door switch. Now that I've gotten the hang of troubleshooting the circuitry, I almost wish there were more things to fix! Most all of the electrical repairs boiled down to: loose terminals, blown fuses or relays and reversed polarity from previous repairs.

I also repaired the rear defrost/heat control. There is a tube that the cable runs through under the rear seat. The tube is welded to the wall that seperates the rear footwell from the area under the seat. The weld had broken and the tube was loose, so the cable couldn't push the louver closed. I just had to use a metal strap to secure the tube in place and the cable now works just fine. Since there are no vent covers in the front, I've rolled up some extra pieces of interior carpeting to stuff in front of the vents. I've now got a small bit of warm air at the windshield on both sides. Of course this is only to be expected, the system even in perfect repair never would deliver much warm air to the windshield. May have to investigate sometime one of the booster kits.

The adjustment on the accelerator cable that Chris recommended really improved the operation of the engine. It now idles at a lower rpm and starts easily everytime. I think it was flooding before and this made it hard to start and lowered the mpg. I'll see this week if my overall milage is improved.

Saturday, November 05, 2005

Winter project: dual 28 pict carbs!

Well, the gang at TheSamba.com thinks it's a splendid plan to replace my single 34pict carb with a pair of 28 pict. I will see a performance increase if I do it right. The only question (beyond whether the used 28 picts still function) is how to set up a linkage system and how to get manifolds for each side.

But, that may end up simpler than I'm thinking if I can just get someone to weld together old manifold pieces.

Best part is the carbs will cost me a total of $0! Jamie said I can just have 'em as he's had them sitting around for 10 years and never used them so far. I told him if it works pretty well for me with his dual 28s he should look at what carb is in his bus and we could maybe fashion together a similar setup there. If he's got a 30 then he can just use the 30 he's got in the box. If he's got a 34 he could probably use mine. Or, better yet, I could trade him his 34 for my dual 28 setup and make a dual 34 setup for mine!

Yep, I'd have some serious power to contend with. Perhaps 80 or so horsepower. Woo ... wow ... heh heh ...

Rich neighbor!

My neighbor, Jamie, is another VW head. He's got a mid-'60s bus that came with a few boxes of spare VW parts! I got to take a mental inventory of his stash last night. Here's what I remember:

* 3 Carbruetors - 2 28 pict and one 30 pict. I've asked on the performance/engine thread at TheSamba.com if it's worth, as a winter project, attempting to hook up the pair of 28 pict carbs in my Ghia, or if they won't be any better than the single 34 pict I have in there now.
* A bundle of distributor wires! One of my wires has cracked housing where it connects to the distributor. Might just pop on over and grab an appropriately-sized replacement.
* Practically brand-new distributor cap. The points are shiny and brassy and the cap looks clean except for cobwebs.
* Power regulator (could have used that two weeks ago)
* 2 fuel pumps (ditto!)
* Coils
* Wiper motor
* Starter motor
* Beetle Speedometer. Ooh, I didn't check to see if there are any insturment light bulb housings in it! I need one more for my parking light indicator.
* Beetle speaker grille. Whoever owned the bus before Jamie must have owned a Beetle, too.
* Hazard switch
* Headlight switch
* Pump-action windshield washer bottle cap (for bus it looks, wouldn't fit mine).

I told him he could sell a lot of that on eBay, but I think for his and my sake he's holding on to it. I'm very curious to hear back from the motorheads at TheSamba.com about the 2x28pict vs 1x34pict carb issue. It'd be kind of a fun winter project, I'd learn a lot about carbs and motors and even if it doesn't get more power I've heard that dual carbs get better throttle response and make the motor operate smoother in general.

Friday, November 04, 2005

A good night of fixes

While Dad's killing brain cells driving around with a leaky heat exhanger, I fixed the following tonight:

* Dome light wiring
* Rear defrost
* Car idles again (but not perfectly)

I used an old bike brake cable to thread through the windshield frame housing. Then, I took a look at this bundle of wires that used to be floating around free in my trunk and noticed it was just right for connecting the dome light to the fuse box. Hmm!

I had to splice some extra wire on here and there, but eventually I just taped the end of the bundle of wires to the end of the cable, pulled it all through and wired it up. Let there be light.

While I was cleaning up the wiring I took a good look at where the various bundles were coming from and noticed one particular loose wire. It was the only loose one that came with a big bundle from the back of the car. I was able to isolate that bundle by isolating the bundle next to it that I now know is for the door switch. I need a new door switch, by the way.

That one loose connection had one of those small female terminals, the kind that's usually plugged into the insturment lights. I couldn't help notice that the back of the little defroster switch had tiny, male terminals it would fit just as well. Plug that wire into the switch, plug another small terminal into the other side that was already hooked up to the fuse box and I've got a rear defogger.

I'm still keeping the appointment Monday with VW Man to fix my idle right, but after tightening a couple hose clamps on the silicone joints between the middle and outer intake manifold pieces my car doesn't die at stop ligths anymore. I'm going to invest major bank in a 13mm socket this weekend and use that to tighten the bolts on the intake pieces where they connect to the engine block and see where that gets me.

That, and a session with the heater boxes and a can a WD-40 and I've got a happenin' weekend shaping up for me!

Heat and Hazzard: Yes!

Well, true to form, MAMotorworks parts arrived today, just one day after placing the order. Those guys are good! So I got the heater cables connected and now I've got heat. Just in time too by the looks of the weather report. Today was nice though and I drove around town with the top down, what fun!

The new flasher relay did the trick for the hazzards, so now most electrical problems are fixed. The seatbelt warning system was dismantled long ago, so I'm not worrying about it. The rear window defrost still needs to be fixed though and the Dome light only goes on when the door is open. You should be able to switch it on in the opposite direction but no luck yet.

While attaching the heater cables I noticed the heat exchanger has rusted through on the driver's side..... Oh well, its only a small hole right now and I am getting sufficient heat... so later...

Monday I'm taking the Ghia to a touchup paint place. They'll see if they can match the paint. The current paint job is not the original color and of course I have no record of what the color is. They should be able to match it pretty close but probably not perfectly. Anyway there are some chips and scratches that need to be covered.

When Dome lights work (finally)!

Well I've had some success solving the minor but nagging electrical problems that have been little mysteries since I got the car.

Dome Light.
The domelight wiring in my case was attached to the mirror. The problem has been that when I test the voltage on the hot wire, it was varying between 2 - 8 volts. I thought maybe this was a short in the channel that was causing some of the other problems. So I connected a know good wire to the fusebox terminal and connected the wire to the terminal on the mirror. The dome light worked! The driver's side door switch also worked, and the light would go on and off. So I thought then that I'd need to thread a new wire through the windshield channel. Chris is right you need a stiffer wire, like an old heater cable or something to thread it through. Having chopped up my old heater cable for reaming out the heater control cable channel, I had nothing to use. So I did a continuity test on the existing wire. The wire tested fine. I wiggled the wire at both ends and everything seemed fine. Then I reattached the wire to the mirror and the dome light worked fine. So I figured problem solved and put the mirror back in place, but then the dome light wouldn't work again. I removed the mirror again and detached the wire, this time the wire connector broke. Hum...maybe was part of the problem. So I attached a new connector, but still low voltage again. I decided to check the end where the wire attaches to the fusebox. When I wiggled it, the voltage would sometimes hit 12 volts and sometimes would drop to 0. One of the problems with this connection was that a Y branch had been attached to this fuse terminal to allow for connecting the memory wire for the radio ( more about this next.) So I redid the wire connector on this end, took off the Y and attached the wire directly with a good solid connection. Now I have a good 12 volts even with the mirror attached. So the dome light now works just fine.

Radio Memory
Now the radio has sometimes had a memory (channel presets, and especially the radio clock) and sometimes not. With no apparent reason everything would reset, it would loose its memory. The memory wire is seperately fused and was attched to fuse #9 along with the dome light. So I decided to use the clock wire from the old clock (which doesn't work anyway) and connect it to the radio memory wire. (The old clock wire had a good solid connection direct to the battery terminal wire.) Now the radio has a good memory. The big problem for both the radio and the dome light was the Y connector's poor connection to the terminal.

Fuel guage
The fuel guage has been jumping around sometimes reading high and sometimes low. Got to be a loose connection somewhere! So I tested the continuity on the sending unit wire. Sure enough when you bent the wire a little bit the ohm meter would jump. In fact it would jump just like the fuel guage. Problem solved, just replace the wire. Now the fuel guage seems stable and accurate but I'll have to watch it over the next week to see how it goes.

The multitester has really paid for itself. Being able to test continuity and voltage levels is a great aid to troubleshooting. Basic rule of thumb is don't assume anything, and test, test, test.

When dome lights don't work

Funny thing, but if the wires coming out of the dome light are snipped off after about 4 inches your dome light will not work! That's what I found out last night.

I'll be spending some time tonight and this weekend threading wire through the windshield housing/channel so my interior light finally illuminates. I tried a little bit of wire threading last night but, as always, found myself ill-equiped to do it properly. I think I'll need to use a cable or something else stiffer and more substantial to start the threading.

The window channel is accessible through the trunk in the front near the outer panel. I'll take pictures of some of this if Dad ever needs to do something similar.

Eventually I'll need new door switches so the light goes on and off when the doors open and close. I'll probably get those in an order with some new rubber seals as I threw some weather stripping on various spots of the doors last night.

I'll also consider getting a can of WD40 to spray the hell out of the joints for the heater duct valves to see if I can work those loose. A couple nights ago I tried hammering them loose but I think all I did was bend the arms a bit. Heh heh ... oops! If that fails I'll as VW Man to see what they can do about 'em. Reese and I would love to drive this thing with heat to her family's annual Festivus dinner (pre-thanksgiving for the retirees who migrate south before real Thanksgiving.)

Time to leave it to the pros again

I can't adjust my carburetor to save my life.

However, I don't believe it's user error. Something else is keeping the car from idling properly. So, I made an appointment with VW Man for Monday morning and I'll let them wrench with it.

The forum folks at TheSamba.com thought I might have a vacuum leak. To troubleshoot they recommended getting a can of starter fluid and then spraying some around the various connection points of the intake manifold when the engine is cold. If there's a leak, when I spray starter fluid at the problem area it should cause the engine RPMs to surge noticeably.

The fix could be as simple as tightening the bolts that hold the intake manifold to the engine and the carburetor to the intake manifold. Of course, getting to the screw on the front side (remember, front side of the car) of the carburetor is anything but simple! If that doesn't solve the leak, then you'll need to remove the manifold and replace gaskets. You may even find the engine block and manifold fittings aren't totally flat, which would involve machining them down so they are and ... yeah, after reading that I decided I could spend a lot of time, energy and frustration on a project like that.

Instead, I'm sure I could spend a bit of money to have someone better at it do it for me in much less time.

Thursday, November 03, 2005

Beep beep, mmm, beep beep, yeah!

The horn works!

I bought a new "auto relay" from Radio Shack for $6.50 to replace the horn relay. Here's what I did to troubleshoot thanks to advice from TheSamba.com:

1. Test the horns - At the horn relay, I unplugged one of the red (hot) wires and touched it to the wire connecting the relay to the horns. *spark!* *BEEP!* Ow ... that was loud. So, OK. I knew my dual horns were good and there was electricity going to the relay.

2. Test the steering wheel button - I pulled off the relay the brown ground wire coming from the dash and wired it in series to a terminal on each horn. I then wired the red live wire in series to the other two terminals. I hit the pad on the steering wheel and hear *punk!* Yeah, you heard me. It didn't beep, it went *punk!* like a dent in metal being pulled out. If I held the steering wheel *just* right, I could get the horn to beep sort of subdued. So! all the wires were good, that meant the problem was at the horn relay!

3. Install new horn relay - I installed the new one exactly the same as the old, hit the pad on the steering wheel and ... nothing ... What the!?!?!?? I re-read the post from TheSamba.com and it looks like everything's hooked up right. So, time to randomly and carelessly cross wires around! Eventually, I figured out I had two terminals switched on the horn relay, got them hooked up right and BEEP! Woo hoo! I can re-join the fun game of road rage!

Now if I can only get the carburetor to idle right *and* have the proper air/fuel mixture ... ugh ...

Wednesday, November 02, 2005

Heater Cable: part duex

Parts arrived today from KarmannGhia.com so I've been busy most of the day getting things put together. The passenger side door is now complete. I needed a trim plate for the door latch release. Got the right part but no screw to attach it. Menards has a selection of metric screws, so I got what I needed there. The only problem was the screw was about 5mm too long. It would screw in all the way but then it would interfere with the release mechanism. I couldn't get the door open! So cussing I had to crawl over the emergency brake and gear shift into the passenger seat to get out that door. (I should have just rolled down the window and opened the door from the outside.) A hack saw shortened the screw to the right length and now everything works just fine.

I finally got the new heater cable installed (after 3 hours of work) but still NO HEAT. :( The clamps on the heater levers are rusted and I broke one trying to get it loosened. So back to the parts catalogue and order more parts. While I'm at it I'll order some fuses (8 and 16amp), a new flasher relay (I've decided that the problem with the hazard lights is the relay), a pedal repair kit (I need the spring to hold the accelerator pedal in place) and a cap for the window wiper arm.

The cables almost went all the way through the channel before getting stuck in the tight spot. After some reaming out I could get one through but the other one just wouldn't budge. More reaming...no luck.....more reaming...no luck....etc. I finaly bent the channel (where the cable emerges) a little bit to straighten it out some and that did the trick. Then in the euphoria of success I was stopped cold by the frozen cable clamps. Curses, it's always something.

I also recieved with this shipment of parts a new hose to connect the heater control box to the body on the driver's side. This went on without too much trouble, although I'm getting tired of having to work with my hands in tight spaces. I decided to check out the passenger side hose while I was at it and good thing I did. It was loose on one end so I reattached it and tightend the clamp. I found the same problem at the other end of the car with the driver's side window vent. The hose that brings hot air was disconnected from the vent, so I reconnected that hose as well. I then noticed that the fresh air cable on that side was loose and attempted to reattach it but the cable sticks and it just comes off again. I'll have to take the cable off and see if it's salvageable.

Now that all the hoses are connected, if I can just get new clamps and get the cables attached to the heat control levers I should be in business.

Closing in on a properly-tuned carburetor

As I've said before, the last mechanic who worked on my VW kind of botched the carburetor adjustment. I've spent a lot of time re-reading the deceptively short and simple instructions and then finally driving around with a long, thin flathead screwdriver and stopping every few miles to turn screws this way and that.

Currently, I've got my flow control screw turned out about 3 turns, which is within the range it *should* be and not nearly all the way out like it was when I first got the car. The bypass valve is about 4 or 5 turns in from being flush with the housing. That one I'm still not sure of where it's supposed to be, but apparently it's the only screw you should adjust to set the idle.

The setting I *know* isn't quite right is the throttle adjustment. I've got it backed out a good 4-5 turns when it should be *just* touching the automatic choke cam on its lowest setting. The carb is probably in need of being completely dismantled and cleaned to get it to run 100%.

But, as-is it's running pretty smooth in low RPMs, the throttle response is better and the last MPG check had it at just under 23 with mostly freeway driving tonight and today but fighting a LOT of wind.

It's supposed to get up to 5 mpg better, from what I've read. So, once I get the motor to idle fine with the throttle screw set right that may make all the difference.

Tuesday, November 01, 2005

Heater cable replaced but no heat

The vents are kinda siezed/rusted in place it seems. I think I'll have to put some Liquid Wrench on them or something and let it sit there for a while to get them to move.

Replacing the cables was, more-or-less, a simple affair. I did have to try the power drill hooked up to a cable technique to bore out a rusted cable housing, but other than that and the very greasy nature of the job it was just thread the new cables through, tighten the screws and you're in business!